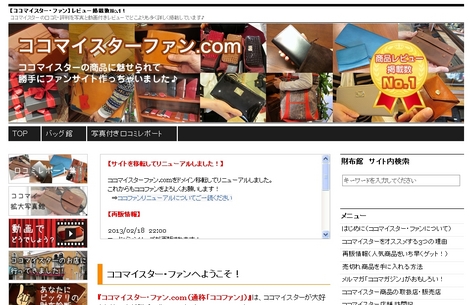
 すごいですね、サイトまで作ってしまうとは・・・。
そんなココマイマニアまで誕生する人気のココマイスター、あなたもお財布の買い替えを検討してみては?
]]>
すごいですね、サイトまで作ってしまうとは・・・。
そんなココマイマニアまで誕生する人気のココマイスター、あなたもお財布の買い替えを検討してみては?
]]>
Mozilla/5.0 (Linux; U; Android 2.1-update1; ja-jp; SO-01B Build/2.0.2.B.0.29) AppleWebKit/530.17 (KHTML, like Gecko) Version/4.0 Mobile Safari/530.17HTC Ariaのユーザーエージェントはこう。
Mozilla/5.0 (Linux; U; Android 2.2.1; ja-jp; HTC Liberty Build/FRG83) AppleWebKit/533.1 (KHTML, like Gecko) Version/4.0 Mobile Safari/533.1Androidなのに『Mobile Safari』なのが面白いところですね。 これはAndroidの標準ブラウザやWebViewが WebKitを元に開発されているからです。 ]]> String userAgentString = webView.getSettings().getUserAgentString(); Log.v("CHECK", userAgentString); webView.getSettings().setUserAgentString(userAgentString+" AppName"); userAgentString = webView.getSettings().getUserAgentString(); Log.v("CHECK", userAgentString); とすればOKです。 (参考)ユーザーエージェントに関する非推奨APIが面白い件 - adakoda 上記はアプリ開発時にユーザーエージェントをいじる方法ですが ユーザーとして標準ブラウザのユーザーエージェントを変更する方法も見つけました。 ・標準ブラウザのUAを変更する方法 参考までにどーぞ。 ]]>
すごいですね、サイトまで作ってしまうとは・・・。
そんなココマイマニアまで誕生する人気のココマイスター、あなたもお財布の買い替えを検討してみては?
]]>
 ]]>
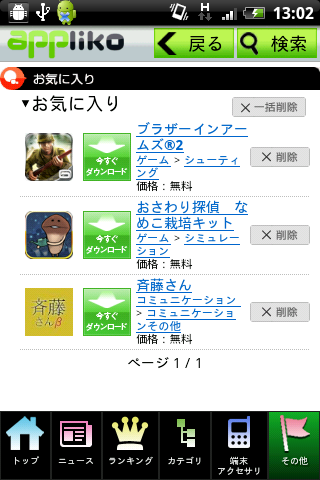
気になるアプリはブクマのように「お気に入り」にいれておくこともできます。
]]>
気になるアプリはブクマのように「お気に入り」にいれておくこともできます。
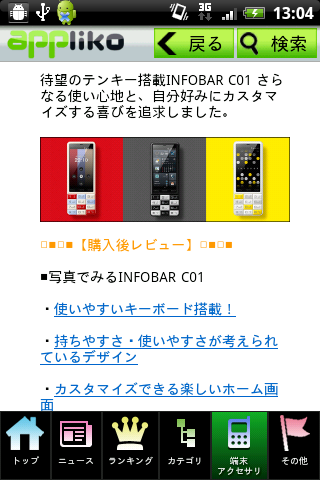
 また、「端末アクセサリ」で、自分の使っている携帯端末の
スタッフレビューやみんなのレビューも見ることができて、
『あ~、自分のスマホはこんな風に評価されてるのね』ってわかります。
また、「端末アクセサリ」で、自分の使っている携帯端末の
スタッフレビューやみんなのレビューも見ることができて、
『あ~、自分のスマホはこんな風に評価されてるのね』ってわかります。
 他の端末のレビューも今後の買い替えで検討したいときに便利ですね。
(新商品は難しいかも?)
このアプリの中で一番目を惹かれてしまったのは「本日のアプリ娘・男」
他の端末のレビューも今後の買い替えで検討したいときに便利ですね。
(新商品は難しいかも?)
このアプリの中で一番目を惹かれてしまったのは「本日のアプリ娘・男」
 かわいい女の子や美青年が日替わりで
自分の携帯やおすすめアプリを紹介してくれています。
ただ、惜しむらくは、バックナンバーの数が少ないこと。
執筆現在では4人のアプリ娘しか見ることができません。
アプリコさん、改善アップデートお願いします~!!
■applikoアプリコ公式サイト
http://appliko.jp/
■アプリダウンロードページ(Androidマーケット)
https://market.android.com/details?id=jp.appliko
]]>
かわいい女の子や美青年が日替わりで
自分の携帯やおすすめアプリを紹介してくれています。
ただ、惜しむらくは、バックナンバーの数が少ないこと。
執筆現在では4人のアプリ娘しか見ることができません。
アプリコさん、改善アップデートお願いします~!!
■applikoアプリコ公式サイト
http://appliko.jp/
■アプリダウンロードページ(Androidマーケット)
https://market.android.com/details?id=jp.appliko
]]>
 サンプルコードはこのサイトのfull source code hereからダウンロードできます。
解説も詳しいので非常に参考になります。
ダウンロードはgithubから。
使い方は下記サイトで詳しく解説してくれてます。
・Cocos2Dの組み込み - AndroDocs
・cocos2d-android を導入してみる。 - コンピュータと、猫背の甘さ。
【AndEngine】
こちらも2Dゲームエンジンですが、
物理計算とかコントロール制御が得意みたいです。
「あのゲームアプリ、これ使ってるのかー」
なんて納得してみたり。
公式サイトはこちら。
http://www.andengine.org/
サンプルも豊富でフォーラムも活発みたいなので、開発しやすそうです。
サンプルアプリは触ってるだけでも楽しいので
ぜひ触ってみてください。
【その他のゲームエンジン】
他にもたくさんのゲームエンジンがあるみたいですが
下記にまとまってましたのでご紹介だけ。
・Androidで使えるゲームエンジン色々 - Web活メモ帳
]]>
サンプルコードはこのサイトのfull source code hereからダウンロードできます。
解説も詳しいので非常に参考になります。
ダウンロードはgithubから。
使い方は下記サイトで詳しく解説してくれてます。
・Cocos2Dの組み込み - AndroDocs
・cocos2d-android を導入してみる。 - コンピュータと、猫背の甘さ。
【AndEngine】
こちらも2Dゲームエンジンですが、
物理計算とかコントロール制御が得意みたいです。
「あのゲームアプリ、これ使ってるのかー」
なんて納得してみたり。
公式サイトはこちら。
http://www.andengine.org/
サンプルも豊富でフォーラムも活発みたいなので、開発しやすそうです。
サンプルアプリは触ってるだけでも楽しいので
ぜひ触ってみてください。
【その他のゲームエンジン】
他にもたくさんのゲームエンジンがあるみたいですが
下記にまとまってましたのでご紹介だけ。
・Androidで使えるゲームエンジン色々 - Web活メモ帳
]]>
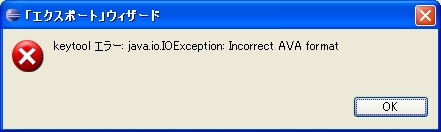 これは組織名などの欄に
無効な文字が入った時に出るエラーのようです。
「, (カンマ)」あたりが怪しいので、チェックしてみるといいでしょう。
]]>
これは組織名などの欄に
無効な文字が入った時に出るエラーのようです。
「, (カンマ)」あたりが怪しいので、チェックしてみるといいでしょう。
]]>
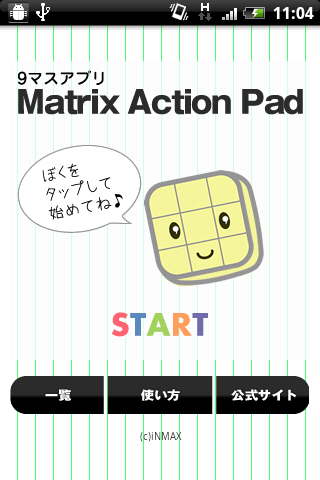 ]]>
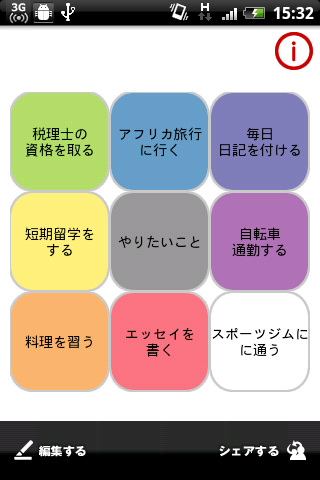
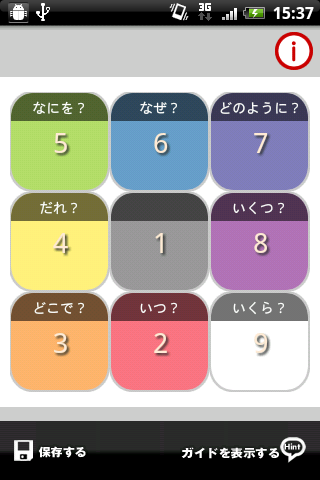
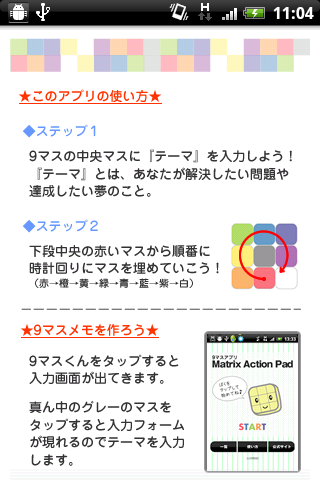
佐藤伝さんの公式アプリです。
『9マスメモ』アプリは
すでに発売され大好評の問題解決ツール『9マス付箋』のアプリバージョンです。
9マスの中心に解決したい問題やテーマを記入し
そのまわりのマスを埋めていくことで悩みがみるみる解決していきます。
悩みだけでなく、夢ややりたいことを書き出してもOKです。
]]>
佐藤伝さんの公式アプリです。
『9マスメモ』アプリは
すでに発売され大好評の問題解決ツール『9マス付箋』のアプリバージョンです。
9マスの中心に解決したい問題やテーマを記入し
そのまわりのマスを埋めていくことで悩みがみるみる解決していきます。
悩みだけでなく、夢ややりたいことを書き出してもOKです。
 明確化は実現への第一歩ですからね。
マスをタップしてどんどん書きこみましょう。
明確化は実現への第一歩ですからね。
マスをタップしてどんどん書きこみましょう。
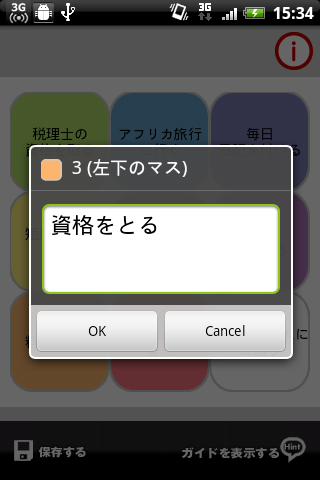 入力に迷った時には、ガイドを使って補助してもらいましょう。
 使い方がわからなくなったときのためにマニュアルもついてます。
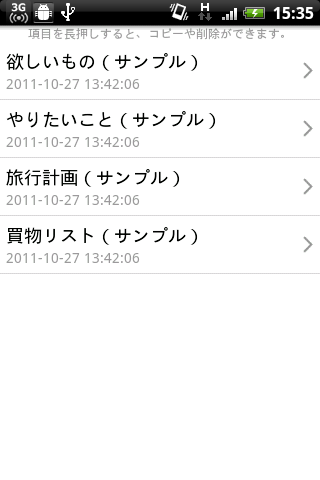
 初期インストール時にはサンプルも付いているので、参考にしてくださいね。
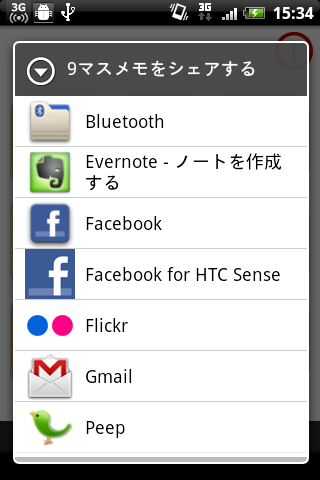
 メモは画像でシェア(共有)することができます。
EvernoteやDropboxに入れてどこでも見れるようにしましょう。
メモは画像でシェア(共有)することができます。
EvernoteやDropboxに入れてどこでも見れるようにしましょう。
 カラフルな色使いも脳を刺激し、アイデアが湧きやすくなるように設計してます。
紙と違ってアプリなので、いくらでも使い放題。
このアプリで身の回りのことをどんどん解決しちゃってください。
■9マスアプリ公式サイト
http://mandalanikki.com/dmap/
■Androidマーケット詳細ページ
https://market.android.com/details?id=com.iNMAX.MAP
]]>
カラフルな色使いも脳を刺激し、アイデアが湧きやすくなるように設計してます。
紙と違ってアプリなので、いくらでも使い放題。
このアプリで身の回りのことをどんどん解決しちゃってください。
■9マスアプリ公式サイト
http://mandalanikki.com/dmap/
■Androidマーケット詳細ページ
https://market.android.com/details?id=com.iNMAX.MAP
]]>
 購入価格は500円なんですが、
自己アフィリOKで報酬が400円なので
実質100円で購入できました。
書籍版は定価1365円なので、超お得です。
アフィリエイター登録はこちらから行なえます。
【※注意※】
Android携帯で読もうと思って買ったんですが、
電子書籍のファイル形式が通常のPDFではなく
KRPDFというファイル形式でした。
(全てのタイトルがKRPDF形式かはわかりませんが)
この形式のファイルは
サイトからダウンロードできるソフトがないと閲覧できないらしく
さらにそのソフトはAndroidにもiOSにも未対応とのこと・・・。
つまりAndroid携帯では読めませんでした・・・orz
でもPCではちゃんと読めますので、
PCで読むので問題ない方にはオススメです。
(ブラウザでも読めます)
早くスマホ対応してもらえることを願います。
購入価格は500円なんですが、
自己アフィリOKで報酬が400円なので
実質100円で購入できました。
書籍版は定価1365円なので、超お得です。
アフィリエイター登録はこちらから行なえます。
【※注意※】
Android携帯で読もうと思って買ったんですが、
電子書籍のファイル形式が通常のPDFではなく
KRPDFというファイル形式でした。
(全てのタイトルがKRPDF形式かはわかりませんが)
この形式のファイルは
サイトからダウンロードできるソフトがないと閲覧できないらしく
さらにそのソフトはAndroidにもiOSにも未対応とのこと・・・。
つまりAndroid携帯では読めませんでした・・・orz
でもPCではちゃんと読めますので、
PCで読むので問題ない方にはオススメです。
(ブラウザでも読めます)
早くスマホ対応してもらえることを願います。
 ]]>
]]>
 ]]>
]]>
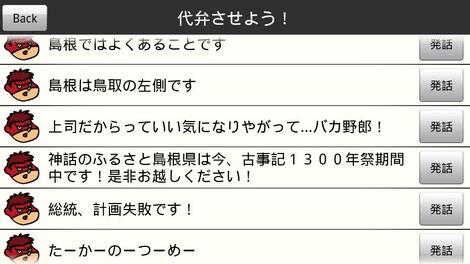
 『あの~もう帰ってもいいですか?』
『今度デートしてください!』
などのちょっと言いにくい言葉も代弁してくれます。
(※結果は自己責任でお願いします)
吉田くんは『しまねSuper大使』にも任命されているため
つぶやけるセリフの中には
『島根ではよくあることです』
『島根は鳥取の左側です』
などの島根発言が含まれているのも特徴的。
もちろん
『たーかーのーつーめー』
とつぶやくこともできます。
これであなたも鷹の爪団の一員!?
アプリのダウンロードはこちらから。
『吉田の代弁』
]]>
『あの~もう帰ってもいいですか?』
『今度デートしてください!』
などのちょっと言いにくい言葉も代弁してくれます。
(※結果は自己責任でお願いします)
吉田くんは『しまねSuper大使』にも任命されているため
つぶやけるセリフの中には
『島根ではよくあることです』
『島根は鳥取の左側です』
などの島根発言が含まれているのも特徴的。
もちろん
『たーかーのーつーめー』
とつぶやくこともできます。
これであなたも鷹の爪団の一員!?
アプリのダウンロードはこちらから。
『吉田の代弁』
]]>
 ソースはこちら。
画面解像度
ファイル:Vector Video Standards2.svg
]]>
ソースはこちら。
画面解像度
ファイル:Vector Video Standards2.svg
]]>
 米Appleの公式サイトでは、ジョブズ氏の写真と冥福を祈るメッセージが掲載されています。
]]>
IT関係企業のみならず、世界に大きな影響を与えた人物といえるでしょう。
享年は56歳。英雄の旅立ちとしては少し早い気がして、淋しいです。
スティーブ・ジョブズ氏のご冥福をお祈りいたします。
米Appleの公式サイトでは、ジョブズ氏の写真と冥福を祈るメッセージが掲載されています。
]]>
IT関係企業のみならず、世界に大きな影響を与えた人物といえるでしょう。
享年は56歳。英雄の旅立ちとしては少し早い気がして、淋しいです。
スティーブ・ジョブズ氏のご冥福をお祈りいたします。


 どうも『Program Files』の半角スペースがよくないみたいです。
プロジェクトによっては、変更後にビルドエラーが出るかもしれないので、
その場合はEclipseを再起動してみてください。
つか、これでハマってる人、多そうだなぁ・・・。
前にApp Inventor が起動しなくなったのも、これが原因だったのかなぁ・・・?
]]>
どうも『Program Files』の半角スペースがよくないみたいです。
プロジェクトによっては、変更後にビルドエラーが出るかもしれないので、
その場合はEclipseを再起動してみてください。
つか、これでハマってる人、多そうだなぁ・・・。
前にApp Inventor が起動しなくなったのも、これが原因だったのかなぁ・・・?
]]>

08-21 20:59:11.663: DEBUG/skia(2053): --- decoder->decode returned falseしかも不可解なことに、 Xperia では発生しないのに IS05 と HTC Aria では発生してました。 ]]> // URLからBitmapへの変換 public static Bitmap getBitmapFromURL(String src) { try { URL url = new URL(src); HttpURLConnection connection = (HttpURLConnection) url.openConnection(); connection.setDoInput(true); connection.connect(); InputStream input = connection.getInputStream(); Bitmap myBitmap = BitmapFactory.decodeStream(input); return myBitmap; } catch (IOException e) { e.printStackTrace(); return null; } } 修正後のOKメソッド↓
	// URLからBitmapへの変換
	public static Bitmap getBitmapFromURL(String src) {

		HttpGet httpRequest =  new HttpGet(src);
		HttpClient httpclient = new DefaultHttpClient();
		HttpResponse response;

		try {
			response = (HttpResponse) httpclient.execute(httpRequest);
			HttpEntity entity = response.getEntity();
			BufferedHttpEntity bufHttpEntity = new BufferedHttpEntity(entity);
			InputStream instream = bufHttpEntity.getContent();
			Bitmap bm = BitmapFactory.decodeStream(instream);
			return bm;
		} catch (ClientProtocolException e) {
			e.printStackTrace();
			Log.v("CHECK", "failed! "+src);
			return null;
		} catch (IOException e) {
			e.printStackTrace();
			Log.v("CHECK", "failed! "+src);
			return null;
		}
Xperia だけで開発していたら気づけなかったな・・・。
]]>
 ここらへんのことは『 Android Layout Cookbook 』
 『えー!?これ同じ ExpandableListView なの???』
って思っちゃいませんか?
まぁ、さすがに、
自分で作るアプリではこんなに凝ったことはしないですが・・・。
しかしレイアウトテクニックは確実にアップすると思います。
『アプリの作り方本』ではないので
初心者の方にはとっつきにくいかもしれませんが、
ひととおりのことができるようになった中級者以上の方は
必携の1冊だと思います。
]]>
『えー!?これ同じ ExpandableListView なの???』
って思っちゃいませんか?
まぁ、さすがに、
自分で作るアプリではこんなに凝ったことはしないですが・・・。
しかしレイアウトテクニックは確実にアップすると思います。
『アプリの作り方本』ではないので
初心者の方にはとっつきにくいかもしれませんが、
ひととおりのことができるようになった中級者以上の方は
必携の1冊だと思います。
]]>
Uri uri = Uri.parse ("mailto:info@hogehoge.com");
Intent intent = new Intent(Intent.ACTION_SENDTO, uri);
intent.putExtra(Intent.EXTRA_SUBJECT, "メールの件名");
intent.putExtra(Intent.EXTRA_TEXT, "メールの本文");
activity.startActivity(intent);
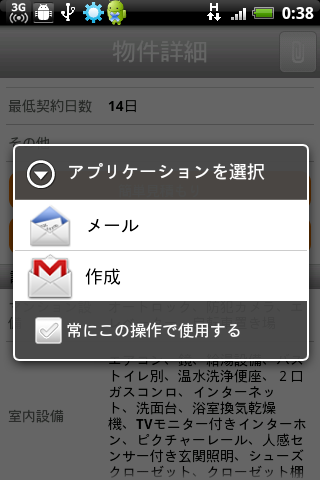
インテントが発行されると、
端末で使用可能なメーラーの選択ダイアログが立ちあがります。
 ]]>
//メールで問い合わせ
public static void contactByMail(final Activity activity) {
AlertDialog.Builder ad=new AlertDialog.Builder(activity);
ad.setMessage("メールで問い合わせますか?");
ad.setPositiveButton("OK", new DialogInterface.OnClickListener() {
public void onClick(DialogInterface dialog,int whichButton) {
//メールの起動
Uri uri = Uri.parse ("mailto:"+activity.getString(R.string.mail));
Intent intent = new Intent(Intent.ACTION_SENDTO, uri);
intent.putExtra(Intent.EXTRA_SUBJECT, "メールの件名");
intent.putExtra(Intent.EXTRA_TEXT, "メールの本文");
activity.startActivity(intent);
}
});
ad.setNegativeButton("Cancel", new DialogInterface.OnClickListener() {
public void onClick(DialogInterface dialog,int whichButton) {
}
});
ad.create();
ad.show();
}
引数は Activity のみ取るようになってますが
メール件名や本文を引数にとってもいいかもしれません。
]]>
]]>
//メールで問い合わせ
public static void contactByMail(final Activity activity) {
AlertDialog.Builder ad=new AlertDialog.Builder(activity);
ad.setMessage("メールで問い合わせますか?");
ad.setPositiveButton("OK", new DialogInterface.OnClickListener() {
public void onClick(DialogInterface dialog,int whichButton) {
//メールの起動
Uri uri = Uri.parse ("mailto:"+activity.getString(R.string.mail));
Intent intent = new Intent(Intent.ACTION_SENDTO, uri);
intent.putExtra(Intent.EXTRA_SUBJECT, "メールの件名");
intent.putExtra(Intent.EXTRA_TEXT, "メールの本文");
activity.startActivity(intent);
}
});
ad.setNegativeButton("Cancel", new DialogInterface.OnClickListener() {
public void onClick(DialogInterface dialog,int whichButton) {
}
});
ad.create();
ad.show();
}
引数は Activity のみ取るようになってますが
メール件名や本文を引数にとってもいいかもしれません。
]]>
Uri uri = Uri.parse("tel:0123456789");
Intent intent = new Intent(Intent.ACTION_DIAL, uri);
startActivity(intent);
tel: のあとに電話番号を入れるだけでOKです。
あとはインテントを発行するだけ。
]]>
public static void contactByTel(final Activity activity) {
AlertDialog.Builder ad=new AlertDialog.Builder(activity);
ad.setMessage("電話で問い合わせますか?");
ad.setPositiveButton("OK", new DialogInterface.OnClickListener() {
public void onClick(DialogInterface dialog, int whichButton) {
//電話の起動
Uri uri = Uri.parse("tel:0123456789");
Intent intent = new Intent(Intent.ACTION_DIAL, uri);
activity.startActivity(intent);
}
});
ad.setNegativeButton("Cancel", new DialogInterface.OnClickListener() {
public void onClick(DialogInterface dialog,int whichButton) {
}
});
ad.create();
ad.show();
}
(複数Activityで共有できるように、Activityを引数に取るメソッド化しています。)
ちなみに、2の直接発信する方法は
Uri uri = Uri.parse("tel:0123456789");
Intent intent = new Intent(Intent.ACTION_CALL, uri);
startActivity(intent);
とします。
Intent に設定するのが Intent.ACTION_CALL になります。
こちらの方法の場合は、
android.permission.CALL_PHONE
を設定するのを忘れずに。
]]>